


Regular replacement of consumables is the single most important task to ensure your Holang PSA Nitrogen Generator operates reliably and efficiently for years.
This guide covers the two most critical consumable components:
-
Filter Elements: To ensure air quality and protect the expensive Carbon Molecular Sieve (CMS) from oil and water contamination.
-
Exhaust Mufflers (Silencers): To manage noise levels and ensure proper venting of waste gas. Clogged mufflers cause backpressure that significantly reduces nitrogen purity and production capacity.
This step-by-step guide will walk you through the standard procedure for replacing both.
⚠️ CRITICAL SAFETY WARNINGS (READ FIRST)
Before performing any maintenance work, it is vital to ensure the system is safe. Failure to follow these warnings may result in severe injury.
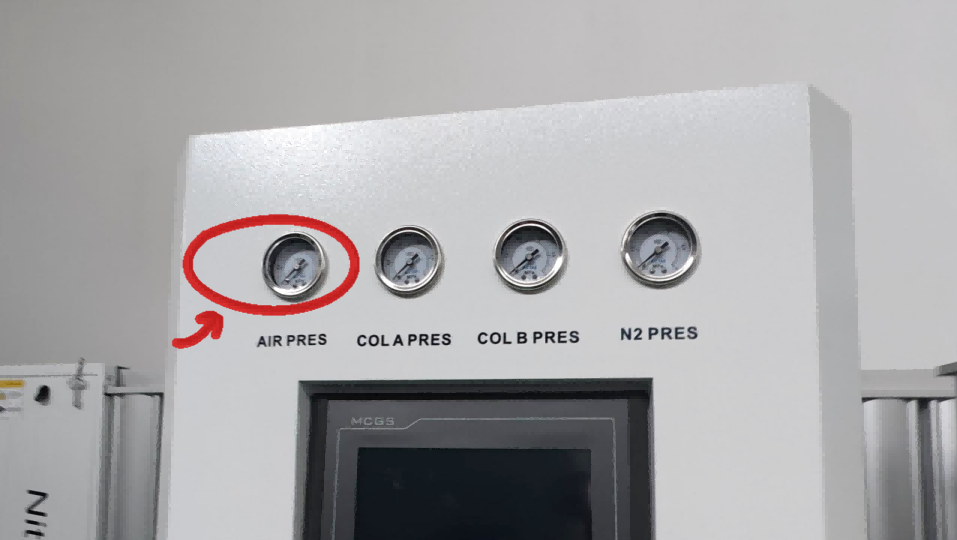
🔴 High Pressure Hazard: Never attempt to loosen a filter housing or a muffler while the system is running or pressurized. The sudden release of pressure can cause parts to be ejected with dangerous force. Ensure all relevant pressure gauges read exactly 0 bar/psi.
⚡ Power Lockout / Tagout: Turn off and lockout the main power supply to the nitrogen generator to prevent accidental startup during the procedure.
👓 PPE Required: Always wear appropriate Personal Protective Equipment, including safety glasses and protective gloves.
Tools and Parts Needed
Before you begin, have the following ready:
-
New set of genuine Holang filter elements.
-
New set of genuine Holang exhaust mufflers.
-
Strap wrench (for filters) and appropriate open-ended or adjustable wrenches (for mufflers).
-
Clean rags and food-grade silicone grease (for filter O-rings).
-
Thread sealant tape (PTFE tape) or thread paste (for muffler installation).
PART 1: Replacing Filter Elements
Step 1: Isolate and Depressurize the System
Safety first. You must ensure zero pressure remains in the filter housings.
-
Stop the Machine: Perform a normal shutdown. Wait for the system to stop completely.
-
Close Isolation Valves: Close the main compressed air inlet valve and the nitrogen gas outlet valve.
-
Venting Residual Pressure:
-
Place a container under the filter drains.
-
Slowly open the manual drain valves on each filter housing.
-
Wait until the hissing stops completely and the pressure gauges read Zero (0).
-
Step 2: Remove the Old Filter Element
-
Unscrew the Bowl: Rotate the filter bowl housing counter-clockwise (use a strap wrench if needed). Do not force it if pressurized.
-
Remove the Element: Unscrew the old element from the filter head (usually counter-clockwise).
-
Clean the Housing: Wipe the inside of the bowl and head clean. Remove all oil sludge and dirt.
Step 3: Install the New Filter Element
-
Prepare O-Rings: Check the O-rings on the housing bowl. Apply a thin film of silicone grease to the new element O-ring and the bowl O-ring.
-
Install Element: Screw the new element clockwise into the head until hand-tight.
-
Reassemble Housing: Screw the housing bowl back on clockwise and hand-tighten firmly. Close the manual drain valves.
PART 2: Replacing Exhaust Mufflers
Mufflers are located on the exhaust ports of the PSA towers. They can become clogged with dust over time or damaged by pressure surges.
Step 1: Locate and Prepare
-
Ensure the machine is stopped and depressurized (as done in Part 1).
-
Locate the exhaust mufflers. They are typically screwed into the bottom or side of the generator valve manifold.
Step 2: Remove Old Mufflers
-
Using an appropriate wrench, turn the old muffler counter-clockwise to loosen it. They may be tight due to thermal cycling.
-
Completely unscrew and remove the old mufflers.
-
Clean the threads on the generator exhaust port with a rag to remove old sealant or debris.
Step 3: Install New Mufflers
-
Apply Sealant: Apply 2-3 wraps of PTFE thread seal tape (Teflon tape) or a suitable thread sealant paste to the male threads of the new mufflers. This is crucial to prevent leaks.
-
Screw In: Insert the new muffler into the exhaust port and turn clockwise by hand to start the thread.
-
Tighten: Use your wrench to tighten the muffler firmly. Do not overtighten, as this could crack the port or the muffler body. Repeat for all mufflers on the unit.
Final Steps: System Restart and Check
-
Open Inlet Valve: Slowly open the main compressed air inlet valve.
-
Check for Leaks: Listen for leaks around the filter housings and the newly installed mufflers.
-
Power On: Start the nitrogen generator.
-
Verify Operation: Check that the unit cycles normally and the exhaust noise is effectively dampened by the new mufflers. Ensure working pressure and purity return to normal levels.
-
Open Outlet Valve: Resume nitrogen supply to your application.
Need Genuine Spare Parts?
Using incorrect filters or mufflers can severely damage your nitrogen generator or reduce its efficiency. Ensure peak performance by using only authentic Holang parts.
-
Contact Our Parts Department for a quote on replacement kits.